

 This is a short guide to getting started with a micro-frontend application. The article focuses more on the webpack configuration and startup code for building and running the app. We will be using Nx to architect, test, and build the application code. We will have three micro-frontend apps:
- Container App (Host) — Responsible for loading other micro-frontend apps.
- Auth App (Remote) — Covering simple authentication flows
- Dashboard App (Remote) — Showing dashboard for user
Container and Auth apps will be built using React whereas the Portal app uses Vue.js. If you want to directly jump to code, visit this Github Repo
First, let’s look briefly at what micro frontend and webpack module federation are.
What are Micro-frontends ??
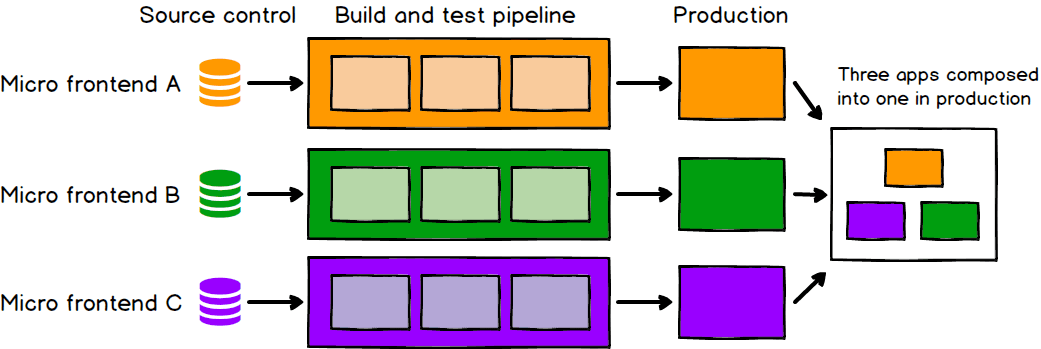
To keep it simple and brief — “A collection of small apps that are developed independently but can be dynamically plugged into the main app”
It is a design approach in which a monolithic frontend app is decomposed into individual, semi-independent “micro-apps” working loosely together.
Webpack 5 Module Federation — A Game Changer
The following article explains Webpack Module Federation and how it helps in designing Micro-frontend architecture. It is written by Zack Jackson, Maintainer of Webpack and Co-Creator of Module Federation. We are using Nx 13 to generate the application structure and boilerplate code.
You can follow the Nx official documentation for commands and available options.
Step 1: Generate Nx Workspace
Generate an Nx workspace with React preset, follows the steps on the console and it will automatically create an application and other necessary configuration files
npx create-nx-workspace@latest --preset=react
Step 2: Add micro-frontend apps
Add an Auth and Dashboard app using an Nx generate application utility
Run the following commands:
npx nx g application auth
npx nx g application dashboard
Step 3: Custom Webpack configuration for host and remote app
Nx manages the webpack configuration by itself to run the project, however we will extend the webpack configuration file and add module federation configuration to it.
Container webpack configuration file looks like this
const ModuleFederationPlugin = require('webpack/lib/container/ModuleFederationPlugin');
const { dependencies } = require('../../../package.json');

module.exports = (config, context) => {
  config.plugins.push(
    new ModuleFederationPlugin({
      name: 'container',
      remotes: {
        auth: 'auth@//localhost:8082/remoteEntry.js',
        dashboard: 'dashboard@//localhost:8083/remoteEntry.js',
      },
      shared: {
        ...dependencies,
      },
    })
  );
  config.output.publicPath = 'http://localhost:8081/';
  config.module.rules = [
    {
      test: /\.m?js/,
      resolve: {
        fullySpecified: false,
      },
    },
    {
      test: /\.(js|tsx|ts)$/,
      use: {
        loader: 'babel-loader',
        options: {
          presets: [
            '@babel/preset-react',
            '@babel/preset-env',
            '@babel/preset-typescript',
          ],
          plugins: ['@babel/plugin-transform-runtime'],
        },
      },
    },
  ];

  return config;
};
This file resides on the following path in the GitHub repo
apps/container/config/webpack.dev.js
Other micro-frontend apps configuration
Auth App Configuration (React App)
apps/auth/config/webpack.dev.js
const ModuleFederationPlugin = require('webpack/lib/container/ModuleFederationPlugin');
const { dependencies } = require('../../../package.json');

module.exports = (config, context) => {
  config.context = process.cwd();
  config.plugins.push(
    new ModuleFederationPlugin({
      name: 'auth',
      filename: 'remoteEntry.js',
      exposes: {
        './AuthApp': 'apps/auth/src/bootstrap',
      },
      shared: {
        ...dependencies,
      },
    })
  );
  config.optimization.runtimeChunk = false;
  config.output = {
    uniqueName: 'auth',
    publicPath: 'http://localhost:8082/',
    clean: true,
  };
  config.module.rules = [
    {
      test: /\.m?js/,
      resolve: {
        fullySpecified: false,
      },
    },
    {
      test: /\.(js|tsx|ts)$/,
      use: {
        loader: 'babel-loader',
        options: {
          presets: [
            '@babel/preset-react',
            '@babel/preset-env',
            '@babel/preset-typescript',
          ],
          plugins: ['@babel/plugin-transform-runtime'],
        },
      },
    },
  ];

  return config;
};
Dashboard App Configuration (Vue App)
apps/dashboard/config/webpack.dev.js
const ModuleFederationPlugin = require('webpack/lib/container/ModuleFederationPlugin');
const { VueLoaderPlugin } = require('vue-loader');
const { dependencies } = require('../../../package.json');

module.exports = (config, context) => {
  config.context = process.cwd();
  config.plugins.push(
    new ModuleFederationPlugin({
      name: 'dashboard',
      filename: 'remoteEntry.js',
      exposes: {
        './DashboardApp': 'apps/dashboard/src/bootstrap',
      },
      shared: {
        ...dependencies,
      },
    }),
    new VueLoaderPlugin()
  );
  config.optimization.runtimeChunk = false;
  config.output = {
    uniqueName: 'dashboard',
    publicPath: 'http://localhost:8083/',
    filename: '[name][contenthash].js',
    clean: true,
  };
  config.devServer.headers = { 'Access-Control-Allow-Origin': '*' };
  config.resolve.extensions = ['.vue', '.js'];
  config.module.rules = [
    {
      test: /\.(png|jpe?g|gif|woff|svg|eot|ttf)$/i,
      use: [{ loader: 'file-loader' }],
    },
    {
      test: /\.(ttf|eot|svg)(\?v=[0-9]\.[0-9]\.[0-9])?$/,
      use: ['file-loader'],
    },
    {
      test: /\.vue$/,
      use: 'vue-loader',
    },
    {
      test: /\.scss|\.css$/,
      use: ['style-loader', 'css-loader', 'sass-loader'],
    },
  ];

  return config;
};
The next step is to point our custom webpack configuration file for each app. You can add this setting in the build options of the project.json file.

Step 4: Application code
You can add code to each app and design it with respect to your use case.
To keep it simple, I have added simple auth flows — SignIn and Signup screens in auth app, whereas some charts and statistics in the dashboard app.
In addition to that, managing the root level routing in the container app — which will determine when and where to load other micro-frontends and app-specific routing in each app entry file “app.tsx”
Step 5: Run apps separately
The beauty of micro-frontend is that we can run each app separately and also through a container/shell app.
We can run auth app like this
npx nx run auth:serve
Auth app running at following URL
[http://localhost:8082/auth/signin](http://localhost:8082/auth/signin)
For dashboard app
npx nx run dashboard:serve
Access the app at http://localhost:8083/dahsboard
Step 6: Run all apps using Container
We can run multiple projects simultaneously using the nx run-many command.
nx run-many --parallel --maxParallel=3 --target=serve --projects=container,auth,dashboard
Access the container by hitting the following URL
http://localhost:8081/
Here, the container will dynamically load other micro-frontend apps which is app and dashboard app in our case on run time.
Next Items
This is a very simple example of getting started and running micro-frontend application, but there are a lot of items to set up for making production ready.
Following are the items:
- Production setup for Mirco-frontend app
- Dockerized application
- CI/CD pipeline
Github Repo
You can check out the code, configurations, and other stuff in this GitHub repo.


